User Interface: Difference between revisions
(The wiki keeps eating my edits.) |
m (→Upper-Right) |
||
| (24 intermediate revisions by 3 users not shown) | |||
| Line 1: | Line 1: | ||
__TOC__ | __TOC__ | ||
[[File:Ui start.png|thumb|550x550px|Start Screen]] | |||
[[File: | |||
== Start Screen == | |||
* Where the game checks for updates. | |||
* Where you log-in if you are on PC/Mac or did not use Habbit Launcher on Android. | |||
* Clear Cache | |||
** This is used to troubleshoot potential problems when assets fail to load correctly in-game. | |||
This menu can be accessed again by going to '''Settings > Support > To Title.''' | |||
== Home Screen == | |||
[[File:Ui mainmenu.png|thumb|550x550px|Home Screen]] | |||
=== Upper Left === | |||
{| class="wikitable mw-collapsible mw-collapsed" | |||
!Icon | |||
!Name | |||
!Detail | |||
|- | |||
| rowspan="4" |[[File:Menu level.png|148x148px]] | |||
|'''Level''' | |||
|Shows your current [[Player Rank]]. | |||
|- | |||
|'''Player ID''' | |||
|Your unique player ID is used to add friends and report issues. (Also accessible in the Player Profile menu) | |||
|- | |||
|'''Player Name''' | |||
|The name you have assigned to your account and to the [[Gaia|main protagonist]]. | |||
|- | |||
|'''Player EXP''' | |||
|Shows how much EXP you need to level up to the next rank. | |||
|} | |||
=== Upper Right === | |||
{| class="wikitable mw-collapsible mw-collapsed" | |||
!Icon | |||
!Name | |||
!Detail | |||
|- | |||
|[[File:Ui draco.png|148x148px]] | |||
|'''Draco''' | |||
|Shows how much Draco you possess. | |||
|- | |||
|[[File:Ui stamina.png|148x148px]] | |||
|'''Stamina''' | |||
|Shows how much Stamina you have, as well as its cap. It is possible to go over the cap, but it will only naturally regenerate up to 100. | |||
Pressing here will take you to the Stamina Recovery menu. | |||
|- | |||
|[[File:Ui vein.png|148x148px]] | |||
|'''Dragon Vein Stones''' | |||
|Shows how much Dragon Vein Stones you possess. Tapping here will take you to the [[Shop]]. | |||
|} | |||
== | === Right === | ||
{| class="wikitable mw-collapsible mw-collapsed" | |||
!Icon | |||
!Detail | |||
File: | |- | ||
|[[File:Ui msq.png|200x200px]] | |||
|'''Main Story Quest''' | |||
* It shows the latest stage you can complete. | |||
* Once you have cleared all current content, it displays "Coming Soon" | |||
* It takes you to the general "Quests Screen" | |||
* You can select through 3 categories of quests: [[Main Storyline|Main Story]], [[Event Quests|Event]], [[Exploration Quests|Exploration]]. | |||
|- | |||
|[[File:Ui eventq.png|200x200px]] | |||
|'''Current Running New Event''' | |||
* It takes you directly to the specific event's "Quests Screen" | |||
|- | |||
|[[File:Ui evenq revival.png|200x200px]] | |||
|'''Rerun Events''' | |||
* A "Revival" badge is displayed on its banner art. | |||
* It takes you directly to the specific event's "Quests Screen" | |||
* Only lists the most recently open re-run. | |||
* May potentially hide extra ones if more than 3 events are currently active. | |||
|} | |||
== | === Bottom === | ||
{| class="wikitable mw-collapsible mw-collapsed" | |||
!Icon | |||
!Name | |||
!Detail | |||
|- | |||
|[[File:Ui warehouse.png|88x88px]] | |||
|'''[[Items|Warehouse]]''' | |||
|View the items you have acquired. Items are organized by tabs: All, Expendables, Valuables, Materials, and Skins. | |||
Stamina restoration items and Recommendation Letters/Scout letters can be used here. | |||
|- | |||
|[[File:Ui shop.png|88x88px]] | |||
|'''[[Shop]]''' | |||
|Purchase various packs using real money. | |||
It is organized through four tabs: Recommendation, Dragon Vein Stone Purchase, Pack, and Purchase Skins. | |||
When purchasing through credit cards, you have an option to save details. | |||
|- | |||
|[[File:Ui party.png|75x75px]] | |||
|'''[[Getting started|Party]]''' | |||
|View the Edit Party screen, which also appears prior to starting battle quests. | |||
There are 4 party slots which can be filled up either one by one by selecting a slot or multiple through "Form Parties." Delete will remove all chosen characters, and leave slow 1 filled by [[Gaia]]. | |||
A party can be filled up to 12 characters. An additional character slot is available for Support units when Partythe screen is selected from a battle quest node. | |||
Character selection uses the Overview screen, which Boost also uses. | |||
|- | |||
|[[File:Ui boost.png|88x88px]] | |||
|'''[[Upgrading Characters|Boost]]''' | |||
|Opens the Overview screen which lists all your acquired characters and a few bits of information for them. | |||
Their portraits show their class, rarity, favorite status, rank, level, skill icon, and name. | |||
Units can be sorted in ascending and descending order according to a few criteria: Level, Cost, Rarity, Class, and Favorite. | |||
* The Class order is [[Vanguard]], [[Fighter]], [[Guard]], [[Caster]], [[Shooter]], [[Healer]], [[Support]], [[Stranger]]. | |||
* Favorite is sorted according to Rarity, with units marked as Favorite simply brought to the top, still sorted by Rarity. | |||
* Units can be marked as a Favorite by clicking on the ribbon icon on their portrait. | |||
<gallery widths="250px" heights="200px" perrow="4"> | Selecting a unit will show their stat breakdown, range, skill level, and description. As well as a button to the Strengthen Screen.<gallery widths="250px" heights="200px" perrow="4"> | ||
File: Party_Screen_Example.jpeg|left|thumb|300px|Make sure to fill your party with the characters you like to use! | File: Party_Screen_Example.jpeg|left|thumb|300px|Make sure to fill your party with the characters you like to use! | ||
File: Strengthening_Screen_Example.jpeg | File: Strengthening_Screen_Example.jpeg|A collection of all the characters you have summoned. | ||
File: Character_Screen_Example.jpeg | File: Character_Screen_Example.jpeg|The Character Screen will provide you with all the necessary information. | ||
File:Level-Up_Screen_Example.jpeg | File:Level-Up_Screen_Example.jpeg|Leveling up your Characters requires Draco and EXP! | ||
</gallery> | </gallery> | ||
|- | |||
|[[File:Ui scout.png|88x88px]] | |||
|'''[[Scouting|Scout]]''' | |||
|This is where characters can be scouted through various means: | |||
* Premium Scouting shows the main rate-up banners are available for a period of time. (Uses Dragon Vein Stones or Edgar Freebie Tickets.) | |||
* You are able to see availability rates through the button on lower left. | |||
* Partner Referrals shows your inventory of "Partner Referral" tickets, which scout random characters defined by a certain pool. | |||
* Partner Scout tickets show your inventory of "Partner Scout" tickets, which allows you to choose through a selection of units to scout. | |||
* Recruitment Flyers shows your inventory of "Adventurer Recruitment Flyers" of varying rarities, which can be pulled from the Flyer Scouting pool. | |||
|- | |||
|[[File:Ui interaction.png|88x88px]] | |||
|'''Interaction''' | |||
|Opens the Interaction selection screen, which displays all your acquired characters and their intimacy level with you. | |||
Selecting a character will open up their Interaction screen where: | |||
* You are greeted by a character with an interaction line (which can be around 5 unique lines you can cycled throug..) | |||
* See their interaction level, the bonuses certain interaction levels give, as well as give them gifts to increase this stat. | |||
* See the list of interaction cgs/stills you have unlocked for the character. Characters have varying amounts of stills. (See [[Still Availability]]) | |||
You also have a button to toggle UI visibility. <gallery widths="250px" heights="200px" perrow="4"> | |||
<gallery widths="250px" heights="200px" perrow="4"> | |||
File:Interaction_Selection_Screen.jpeg|Simply select a character you like and.. | File:Interaction_Selection_Screen.jpeg|Simply select a character you like and.. | ||
File: Interaction_Screen_Example.jpeg|...enjoy spending time with them! | File: Interaction_Screen_Example.jpeg|...enjoy spending time with them! | ||
</gallery> | </gallery> | ||
|} | |||
=== Left === | |||
{| class="wikitable mw-collapsible mw-collapsed" | |||
!Icon | |||
!Name | |||
!Detail | |||
|- | |||
|[[File:Menu notif.png|76x76px]] | |||
|'''Announcements''' | |||
|View banner announcements, notifications, and recent patch notes. | |||
These are pulled from the official [https://anothereidos-r.info/en/ AnotherEidos News Website] | |||
|- | |||
|[[File:Menu mail.png]] | |||
|'''Mailbox''' | |||
|Collect weekly maintenance stones here. | |||
If you experience a failed transaction and you submit a support ticket the items can be picked up here as well. | |||
|- | |||
|[[File:Menu profile.png]] | |||
|'''User Information''' | |||
|Access the User Information screen. It has four tabs: | |||
* User Information shows your chosen partner, username, personal description, friend code, chosen support character, game start date, and total possessed characters. | |||
* Changing your support character allows you to select a desired unit via the Overview Screen. | |||
* Follow shows a list of players you've chosen to follow. While, Followers is a list of players that chose to follow you. You can sort them according to partner level or last login. | |||
* On the follower/following list details, it shows their user information as well as the option to follow/unfollow them where it applies. | |||
* Friend Search allows you to find users via their friend code.<gallery widths="250px" heights="200px" perrow="4"> | |||
File:Player_Profile.jpeg|Personalize your Profile with a witty Signature! | |||
</gallery> | |||
|- | |||
|[[File:Menu settings.png]] | |||
|'''Settings''' | |||
|Access various settings in the game. | |||
*'''Audio Settings''' - Adjust sound effect and background volume. | |||
*'''Name Display Settings''' | |||
**Change dislay language, the hero's name, and your username. | |||
**For PC, Screen Resolution Settings can be set here. | |||
**Also, hotkeys: F1 - Change screen resolution; F2/ ALT+Enter - Toggle Fullscreen. | |||
*'''Support''' | |||
**'''Send Support/Inquiry ticket. (Use this to send bug reports and issues.)''' | |||
**Confirm the number of paid Dragon Vein Stones you currently possess. | |||
**View ToS, Privacy Policy | |||
**Return to Title, Log Out | |||
|- | |||
|[[File:Menu login.png]] | |||
|'''Daily Login''' | |||
|View your daily login progress and the login rewards for every 30 days. | |||
See [[Login Rewards]] for more info. | |||
|- | |||
|[[File:Menu partner.png]] | |||
|'''Swap Partner''' | |||
|Change the displayed character on the main screen. This character and their level will be designated as your partner which shows up in your User Information. | |||
|- | |||
|[[File:Menu adjust.png]] | |||
|'''Adjust Partner/BG''' | |||
|Adjust the position and size of the character art on the main screen, as well as change backgrounds. | |||
|- | |||
|[[File:Menu rank.png]] | |||
|'''Rank Toggle''' | |||
|Switch between character art used by their corresponding rank. | |||
|- | |||
|[[File:Menu notice.png|140x140px]] | |||
|'''Notices''' | |||
|Shows notice images of various ongoing pick-up banners, events, and a short article on how to get started with the game. | |||
|} | |||
== Strengthen Screen == | |||
The Strengthen screen shows the full details of your unit as well as access to upgrading them. | |||
Details on stats can be viewed in [[Character Stats]], and details on character upgrading can be viewed in [[Upgrading Characters]]. | |||
=== Upper Right === | |||
You are able to change character skins, rewatch their rank-up animation, show their gallery, and hide the UI. | |||
==== Changing/Unlocking Skins ==== | |||
Character skins can be changed via the boost screen of a character. Characters can unlock different sprite designs that can be used in combat. Currently, most characters unlock one on rank up, with most being simple palette swaps of their originals, while some are totally different looks for the characters. See [[Skins]]. | |||
==== Gallery ==== | |||
You can view a character's visual novel sprite and game sprite via the boost screen. Most characters will have their base, swimsuit, and nude forms. Access to certain forms requires having enough Bond Value. | |||
=== Left and Lower Middle === | |||
The details on the left side include their faction, stats, rarity, title, name, class, and range. On the lower-middle, it details their illustrator credit. | |||
=== Right Side === | |||
On the right side, it shows their boost-able attributes: Level, Rank, Proficiency, and Skill, as well as details on their Trait and Nature. | |||
==== Boosting Level ==== | |||
Shows your character's stats on the left and your inventory of EXP items on the right. You can set the amount of these items you plan to consume, which shows its effect and cost on the left. | |||
==== Boosting Rank ==== | |||
Shows the required items needed to boost the character's Rank. This screen is not accessible if they no longer have a Rank to upgrade to. | |||
==== Boosting Proficiency ==== | |||
Shows the required items, Dracos, and success rate of boosting a unit's Proficiency by one step at a time. | |||
==== Boosting Skill ==== | |||
Shows the required items needed to boost a Skill's level. It also compares the description of the Skill between its current and next Level. | |||
== Quest Screen == | |||
Tapping on the top right banner from the main menu will take you to the [[Quests]] selection screen. There, you can change quest categories by selecting between the three: [[Main Storyline|The Story]], [[Exploration Quests|Exploration]], or [[Event Quests|Events]]. | |||
'''''Note:''' Any exploration and event can be started at any time, but the main story must be completed in chronological order.'' | |||
Selecting a chapter, event, or exploration will take you to that specific section's specific quest selection. Where you can access nodes that are either Story or Battle quests: | |||
<gallery widths=" | * Story quests are presented with a visual novel-style UI. They can contain "Stills," which can also be accessed through the Interaction screen for the respective character involved once the node is completed. For details on stills, see [[Interaction]]. | ||
File: | |||
* Battle quests take you to the party screen, where you can choose what party to use in combat, as well as an extra slot you can use to use other players' Support units or not. For the actual mechanics of combat, see [[The Battle System]].<center> | |||
<gallery widths="250" heights="200" perrow="4"> | |||
File:Example Quest Selection.png|Switch between story, exploration, and event quests by tapping the icons on the bottom. More story quests will unlock as you progress through the story. | |||
File:Example Story Selection.png|Each node on the quest selection screens can have stories and battles attached to it. More quests are unlocked as you complete them. Some chapter 0 battles have story sections. This only occurs in Chapter 0. | |||
File:Example Exploration Selection.png|Any exploration quest can be completed at any time. There are no daily or completion restrictions. | |||
</gallery> | </gallery> | ||
== Stamina Recovery Menu == | |||
* Shows you your stamina recovery items, their quantities, and their expiration if any. | |||
* You can also use Dragon Vein Stones to replenish Stamina (but it is not the best use of the currency). | |||
* You can overcap Stamina by using plenty of recovery items at once. | |||
[[Category:Game Guide]] | |||
Latest revision as of 04:42, 18 March 2025

Start Screen[edit | edit source]
- Where the game checks for updates.
- Where you log-in if you are on PC/Mac or did not use Habbit Launcher on Android.
- Clear Cache
- This is used to troubleshoot potential problems when assets fail to load correctly in-game.
This menu can be accessed again by going to Settings > Support > To Title.
Home Screen[edit | edit source]

Upper Left[edit | edit source]
| Icon | Name | Detail |
|---|
Upper Right[edit | edit source]
| Icon | Name | Detail |
|---|
Right[edit | edit source]
| Icon | Detail |
|---|


Bottom[edit | edit source]
| Icon | Name | Detail |
|---|


Left[edit | edit source]
| Icon | Name | Detail |
|---|


Strengthen Screen[edit | edit source]
The Strengthen screen shows the full details of your unit as well as access to upgrading them.
Details on stats can be viewed in Character Stats, and details on character upgrading can be viewed in Upgrading Characters.
Upper Right[edit | edit source]
You are able to change character skins, rewatch their rank-up animation, show their gallery, and hide the UI.
Changing/Unlocking Skins[edit | edit source]
Character skins can be changed via the boost screen of a character. Characters can unlock different sprite designs that can be used in combat. Currently, most characters unlock one on rank up, with most being simple palette swaps of their originals, while some are totally different looks for the characters. See Skins.
Gallery[edit | edit source]
You can view a character's visual novel sprite and game sprite via the boost screen. Most characters will have their base, swimsuit, and nude forms. Access to certain forms requires having enough Bond Value.
Left and Lower Middle[edit | edit source]
The details on the left side include their faction, stats, rarity, title, name, class, and range. On the lower-middle, it details their illustrator credit.
Right Side[edit | edit source]
On the right side, it shows their boost-able attributes: Level, Rank, Proficiency, and Skill, as well as details on their Trait and Nature.
Boosting Level[edit | edit source]
Shows your character's stats on the left and your inventory of EXP items on the right. You can set the amount of these items you plan to consume, which shows its effect and cost on the left.
Boosting Rank[edit | edit source]
Shows the required items needed to boost the character's Rank. This screen is not accessible if they no longer have a Rank to upgrade to.
Boosting Proficiency[edit | edit source]
Shows the required items, Dracos, and success rate of boosting a unit's Proficiency by one step at a time.
Boosting Skill[edit | edit source]
Shows the required items needed to boost a Skill's level. It also compares the description of the Skill between its current and next Level.
Quest Screen[edit | edit source]
Tapping on the top right banner from the main menu will take you to the Quests selection screen. There, you can change quest categories by selecting between the three: The Story, Exploration, or Events.
Note: Any exploration and event can be started at any time, but the main story must be completed in chronological order.
Selecting a chapter, event, or exploration will take you to that specific section's specific quest selection. Where you can access nodes that are either Story or Battle quests:
- Story quests are presented with a visual novel-style UI. They can contain "Stills," which can also be accessed through the Interaction screen for the respective character involved once the node is completed. For details on stills, see Interaction.
- Battle quests take you to the party screen, where you can choose what party to use in combat, as well as an extra slot you can use to use other players' Support units or not. For the actual mechanics of combat, see The Battle System.
-
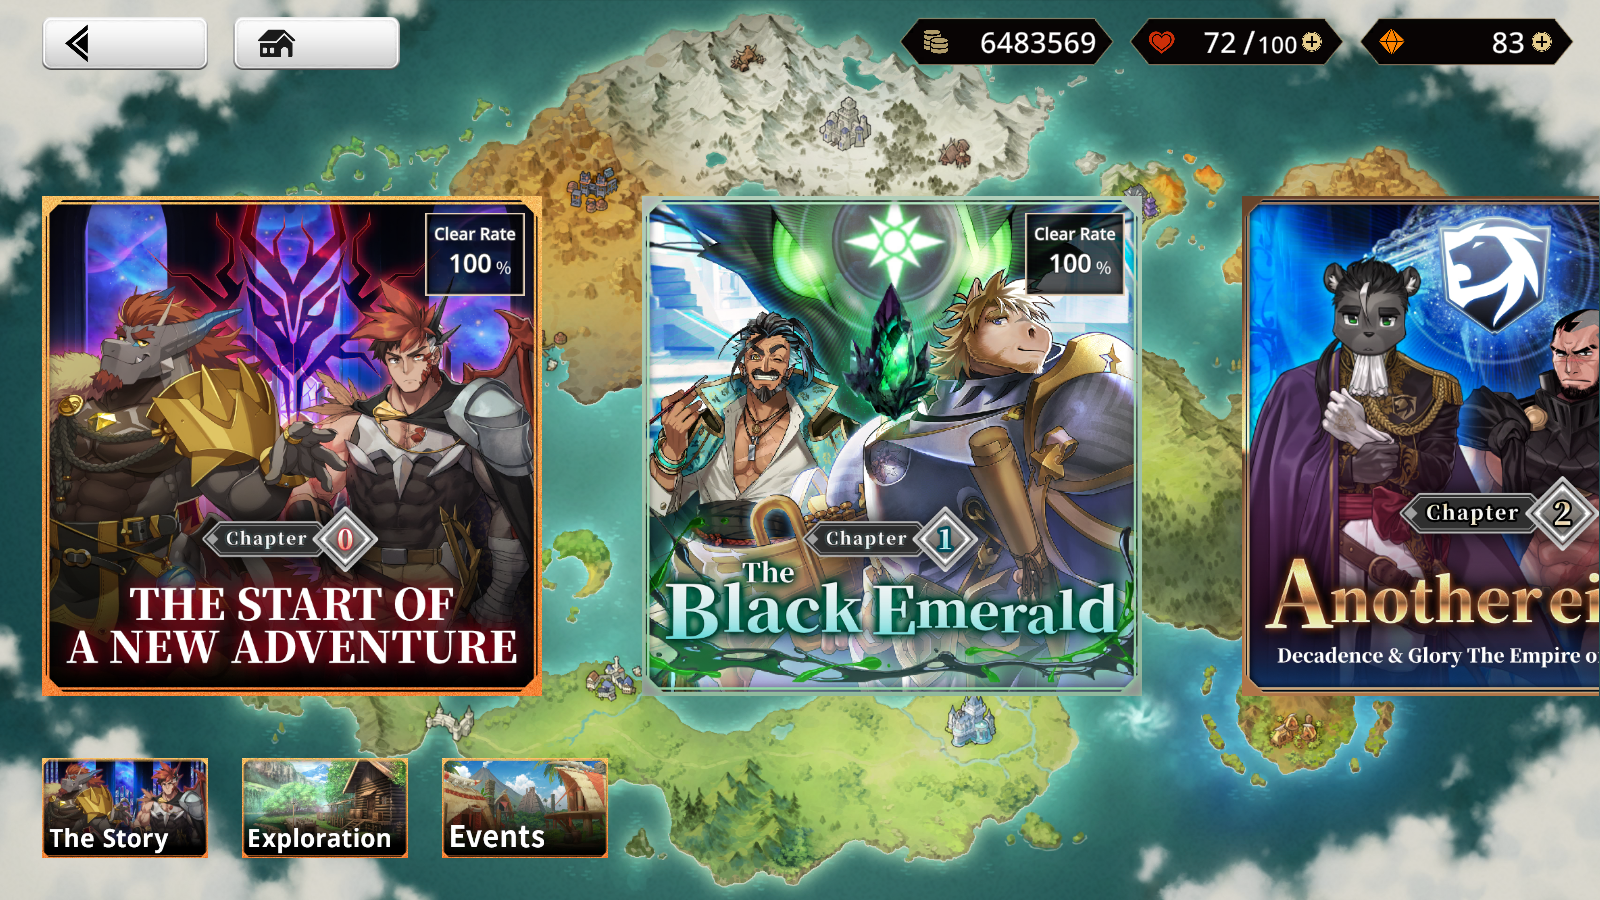
Switch between story, exploration, and event quests by tapping the icons on the bottom. More story quests will unlock as you progress through the story.
-
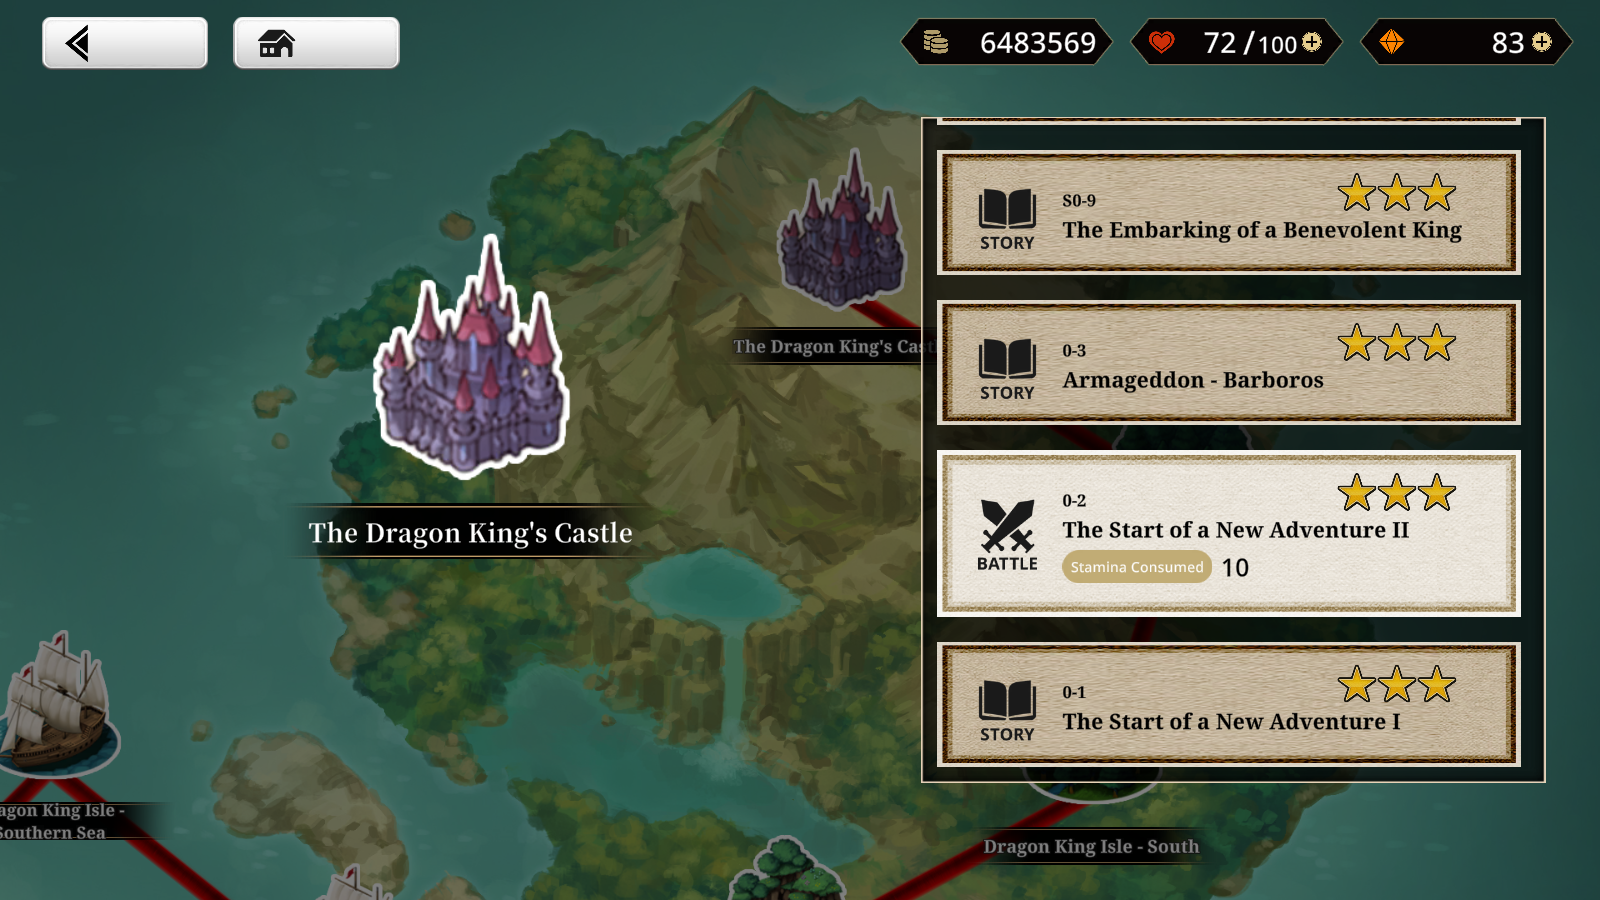
Each node on the quest selection screens can have stories and battles attached to it. More quests are unlocked as you complete them. Some chapter 0 battles have story sections. This only occurs in Chapter 0.
-
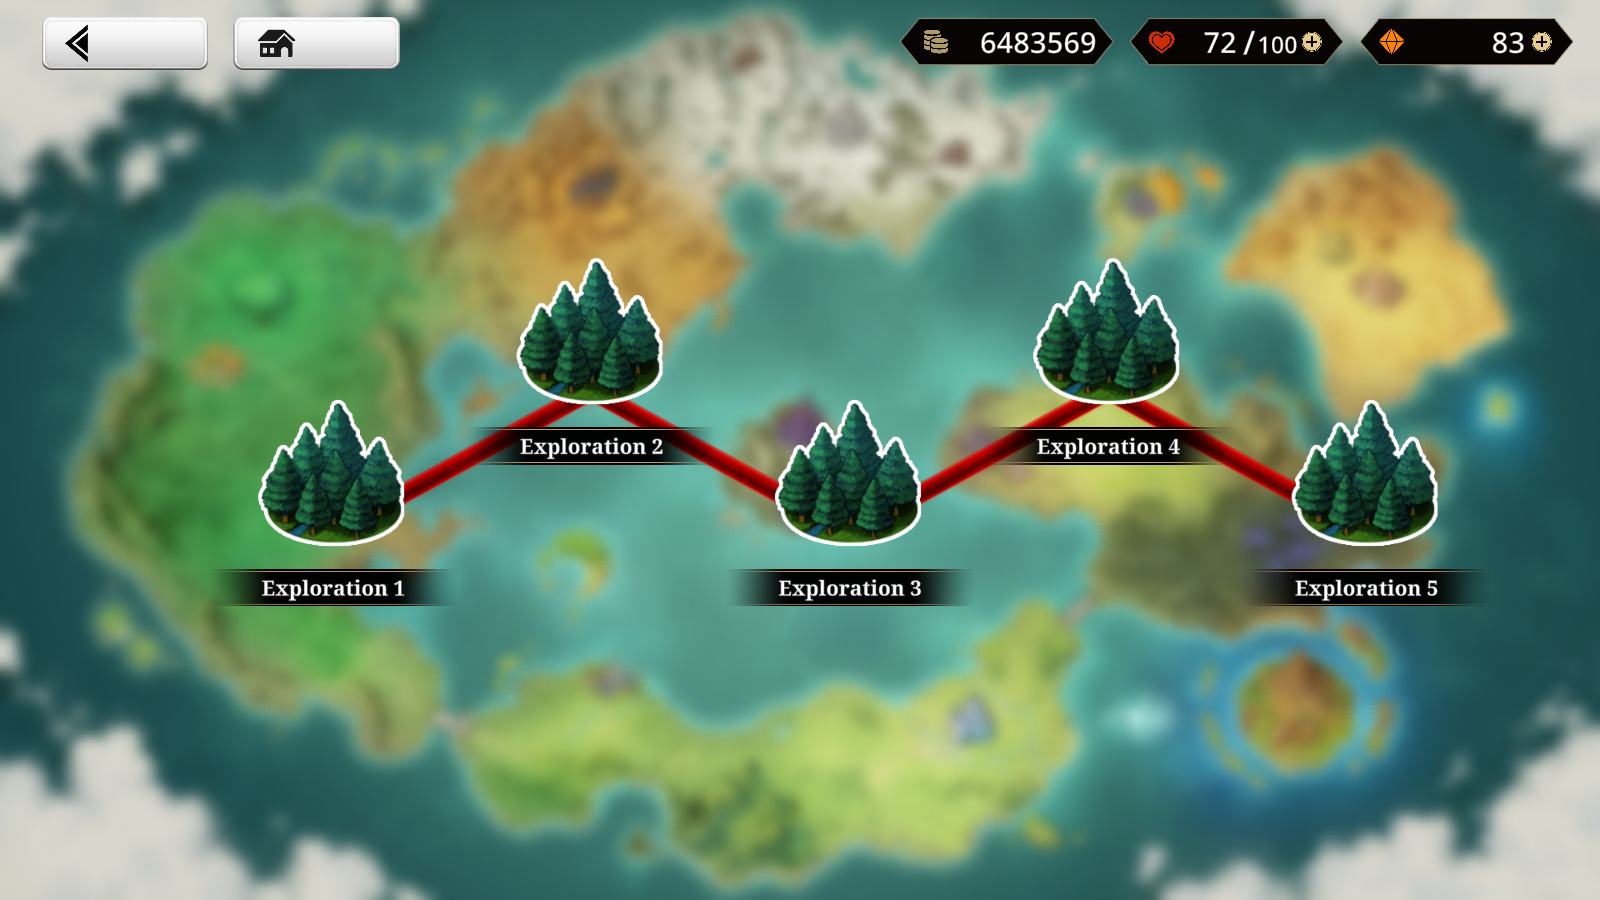
Any exploration quest can be completed at any time. There are no daily or completion restrictions.


Stamina Recovery Menu[edit | edit source]
- Shows you your stamina recovery items, their quantities, and their expiration if any.
- You can also use Dragon Vein Stones to replenish Stamina (but it is not the best use of the currency).
- You can overcap Stamina by using plenty of recovery items at once.