The Battle System: Difference between revisions
No edit summary |
No edit summary |
||
| (40 intermediate revisions by 3 users not shown) | |||
| Line 1: | Line 1: | ||
The battle system features a real-time tower defense gameplay. Refer to [[Tips and Tricks]] for supplementary info. This is part of [[Getting started]]. | |||
If you're looking for info for stats, refer to [[Character Stats]] | |||
' | |||
== | == Party and Support == | ||
Before the start of combat, you are able to build a team of up to 12 characters you own and can opt to include an extra character on the support slot. | |||
Characters all have varying niches they fill and are useful in different stages of the battle, these are defined by their stats and other battle information detailed below. | |||
== | ==Battle UI== | ||
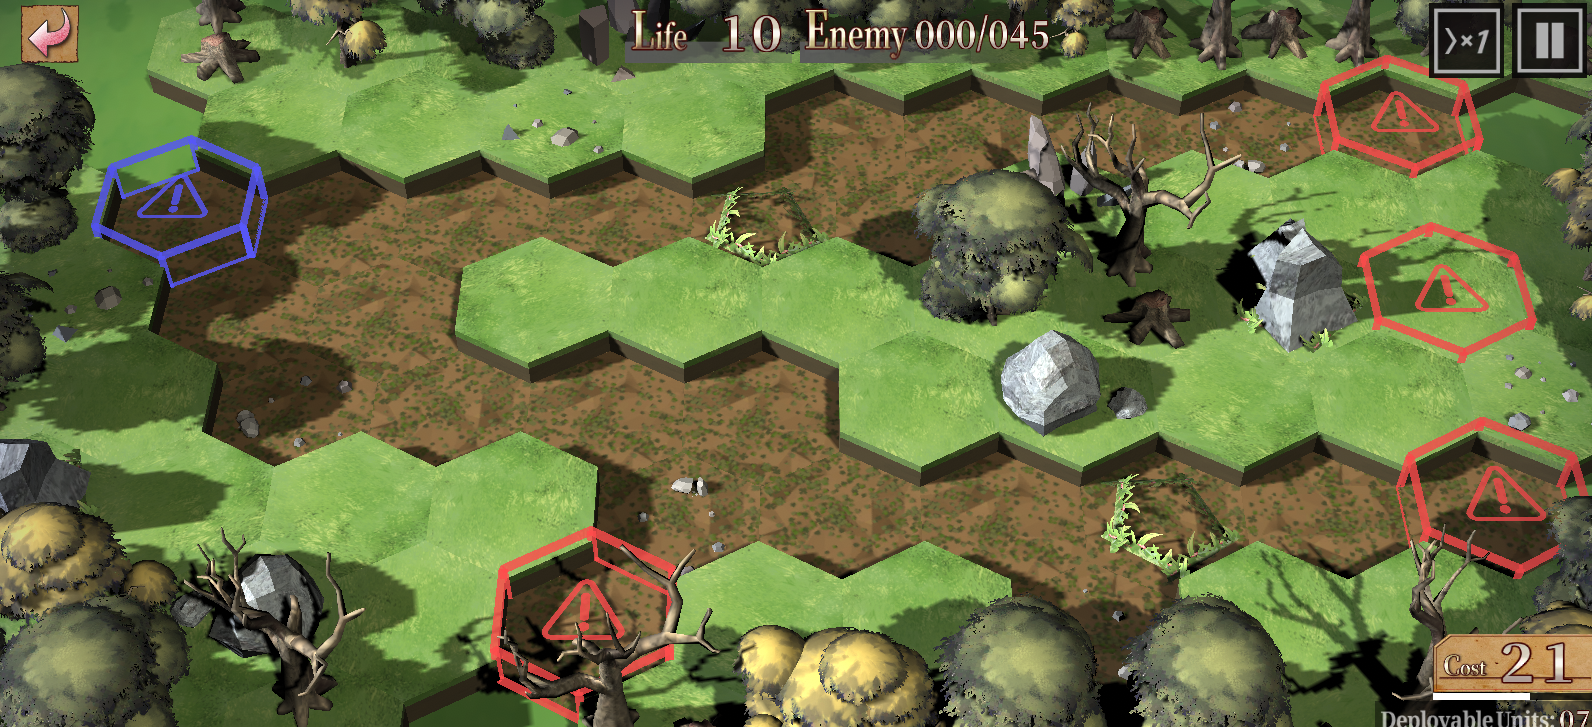
[[File:Mapexample.png|thumb|450x450px|The basis of AnotherEidos is Tower Defense. Select a character to place it on a hex. It will auto attack when an enemy gets in range of it. When the bar under a character is filled, tap it to use it's skill ]] | |||
| | === Upper Portion === | ||
* The upper portion of the battle screen shows much life you have and the current status of how many enemies have spawned in the map. | |||
| | * On the left you have an option to quit the battle, which effectively admitting a loss, while on the right you have buttons for pausing or toggling gameplay speed between 1x and 2x. | ||
=== Lower Portion === | |||
* On the lower right side, you can monitor how much cost you currently accumulated. | |||
* You'll be able to see the units you brought into the fight, arranged from highest to lowest cost. They display their class and cost on the top section of their icon. | |||
** When you select a unit that's ready to be deployed, you'll be able to view their stats and slow down the game. | |||
** You deploy the unit by dropping their sprite on the map, and choosing a direction for them to face. | |||
=== Bases === | |||
* Red bases are enemy spawn points. Most enemies come out this way, but some stages may have gimmicks which subvert this rule. | |||
* Blue bases are your bases, which you need to prevent enemies from passing towards. | |||
=== Map Tiles === | |||
* There are two tile types, high ground and low ground tiles. | |||
* Most enemies will be moving through low ground tiles and are blocked by low ground units. | |||
* There are enemies who fly, move across any type of tiles, and cannot be blocked by any unit, unless stated otherwise by a unit's capabilities. | |||
=== Character === | |||
* Characters will have indicator of block count in the form of shield icons, as well as a bar indicating their HP, and their SP. | |||
* Selecting a deployed character will show their details and slow down the game speed. | |||
* While selecting a character, there buttons to withdraw the unit, as well as one for activating their skill. | |||
=== Enemies === | |||
* When a wave of enemies are about to spawn, they will indicate their intended pathing across the map before hand. | |||
* Enemies have a bar indicating their hp. | |||
* Boss enemies will have a red indicator on where they stand. | |||
== Flow of Battle == | |||
=== Generating Cost === | |||
Cost is the resource used to deploy your units, which is gained at a rate of one per second. Vanguard class units are typically cheap enough to be deployed early and can generate cost in one way or another. | |||
=== Enemies Spawning and Deploying Units === | |||
An enemy is expected to spawn when a line appears for a brief moment on the map. This is the intended path the enemy will take from their spawn point to your base, and is usually your basis for where to deploy characters and which direction to face them, Enemies move with varying movement speeds, while your characters stay on their deployed tiles. | |||
=== Dealing with Enemies === | |||
There two types of tiles positions: High and Low tiles. Most enemies walk in low tiles and can be blocked by characters, in which both your unit and the blocked enemy will begin dealing damage to each other. However, some fly and bypass being blocked and must be dealt with ranged attackers. Enemies with ranged attacks will prioritize the most recently deployed character that is within their range. | |||
=== Sustaining Allies === | |||
Besides dealing damage, there are also characters capable of healing your allies instead of hurting enemies. These are typically Healers, though there are characters with different ways of also performing healing or sustain for others or themselves on their kits. | |||
=== Withdrawing Allies === | |||
Characters can be killed by enemies are withdrawn from the battle, which will return them to the pool of deployable characters, but with a cooldown reposition timer. You can manually perform this for the sake of strategy or to prevent a fallen ally from reducing your fight's star rating. | |||
=== Using Skills === | |||
Skills are special abilities that characters can use to change the tide of battle. Skills cost SP to use, but as explained above, SP is tied to each Skill, not the character. The general SP progress of a skill can be seen by either looking at the blue bar that grows beneath a character, or by tapping on that character and examining the square box that pops up below the character. Characters gain sp at a rate of one per second, and can trigger skills, either automatically or manually. The SP bar will turn yellow when full. Once full, for manually activated skills, simply tap the Skill icon to use it. For automatically activated skills, they simply will await until their conditions are met. | |||
{| | |||
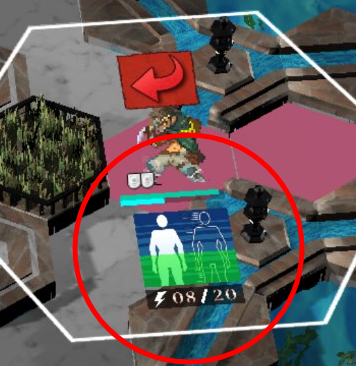
![[File:Skillexample.png|thumb|237x237px|'''The blue box circled in red is an example of a Skill. It's currently generated 8 SP out of a max of 20 SP.''' ]] | |||
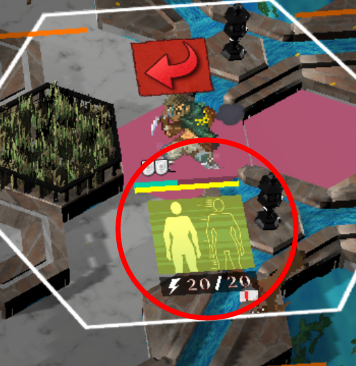
![[File:SkillExample2.png|thumb|237x237px|In general, a Skills SP bar must be full to use a Skill, but there are exceptions.]] | |||
| | |||
| | |||
| | |||
| | |||
| | |||
| | |||
|} | |} | ||
== | === Win/Lose Condition === | ||
When enemies go through your base, your life would be deducted a point, and reaching zero leads to a game over. Successfully beating all enemies and maintaining at least 1 life would lead to a victory. Depending on your performance on keeping characters alive, and enemies away from the base would determine your star rating, which may determine some of the drops you will get. Beating a stage with 3 stars unlocks their 4 star challenge, and ability to use skip tickets to bypass playing the stage for farming purposes. Characters you bring along in a stage will gain bond at the end, regardless if they were used or not. | |||
== Status Ailments == | |||
There are few status conditions characters can be subjected to in game. Here are what's been seen: | |||
* '''Stunned''' - Character cannot attack, block, or move. | |||
* '''Charmed''' - Character will stop blocking and attack any allies within their range. Ground melee characters will be able to reach high ground ones. | |||
* '''Poisoned''' - Character receives gradual damage over time. | |||
==Character Stats and Information== | |||
See [[Character Stats]] | |||
Latest revision as of 17:16, 17 April 2024
The battle system features a real-time tower defense gameplay. Refer to Tips and Tricks for supplementary info. This is part of Getting started.
If you're looking for info for stats, refer to Character Stats
Party and Support[edit | edit source]
Before the start of combat, you are able to build a team of up to 12 characters you own and can opt to include an extra character on the support slot.
Characters all have varying niches they fill and are useful in different stages of the battle, these are defined by their stats and other battle information detailed below.
Battle UI[edit | edit source]

Upper Portion[edit | edit source]
- The upper portion of the battle screen shows much life you have and the current status of how many enemies have spawned in the map.
- On the left you have an option to quit the battle, which effectively admitting a loss, while on the right you have buttons for pausing or toggling gameplay speed between 1x and 2x.
Lower Portion[edit | edit source]
- On the lower right side, you can monitor how much cost you currently accumulated.
- You'll be able to see the units you brought into the fight, arranged from highest to lowest cost. They display their class and cost on the top section of their icon.
- When you select a unit that's ready to be deployed, you'll be able to view their stats and slow down the game.
- You deploy the unit by dropping their sprite on the map, and choosing a direction for them to face.
Bases[edit | edit source]
- Red bases are enemy spawn points. Most enemies come out this way, but some stages may have gimmicks which subvert this rule.
- Blue bases are your bases, which you need to prevent enemies from passing towards.
Map Tiles[edit | edit source]
- There are two tile types, high ground and low ground tiles.
- Most enemies will be moving through low ground tiles and are blocked by low ground units.
- There are enemies who fly, move across any type of tiles, and cannot be blocked by any unit, unless stated otherwise by a unit's capabilities.
Character[edit | edit source]
- Characters will have indicator of block count in the form of shield icons, as well as a bar indicating their HP, and their SP.
- Selecting a deployed character will show their details and slow down the game speed.
- While selecting a character, there buttons to withdraw the unit, as well as one for activating their skill.
Enemies[edit | edit source]
- When a wave of enemies are about to spawn, they will indicate their intended pathing across the map before hand.
- Enemies have a bar indicating their hp.
- Boss enemies will have a red indicator on where they stand.
Flow of Battle[edit | edit source]
Generating Cost[edit | edit source]
Cost is the resource used to deploy your units, which is gained at a rate of one per second. Vanguard class units are typically cheap enough to be deployed early and can generate cost in one way or another.
Enemies Spawning and Deploying Units[edit | edit source]
An enemy is expected to spawn when a line appears for a brief moment on the map. This is the intended path the enemy will take from their spawn point to your base, and is usually your basis for where to deploy characters and which direction to face them, Enemies move with varying movement speeds, while your characters stay on their deployed tiles.
Dealing with Enemies[edit | edit source]
There two types of tiles positions: High and Low tiles. Most enemies walk in low tiles and can be blocked by characters, in which both your unit and the blocked enemy will begin dealing damage to each other. However, some fly and bypass being blocked and must be dealt with ranged attackers. Enemies with ranged attacks will prioritize the most recently deployed character that is within their range.
Sustaining Allies[edit | edit source]
Besides dealing damage, there are also characters capable of healing your allies instead of hurting enemies. These are typically Healers, though there are characters with different ways of also performing healing or sustain for others or themselves on their kits.
Withdrawing Allies[edit | edit source]
Characters can be killed by enemies are withdrawn from the battle, which will return them to the pool of deployable characters, but with a cooldown reposition timer. You can manually perform this for the sake of strategy or to prevent a fallen ally from reducing your fight's star rating.
Using Skills[edit | edit source]
Skills are special abilities that characters can use to change the tide of battle. Skills cost SP to use, but as explained above, SP is tied to each Skill, not the character. The general SP progress of a skill can be seen by either looking at the blue bar that grows beneath a character, or by tapping on that character and examining the square box that pops up below the character. Characters gain sp at a rate of one per second, and can trigger skills, either automatically or manually. The SP bar will turn yellow when full. Once full, for manually activated skills, simply tap the Skill icon to use it. For automatically activated skills, they simply will await until their conditions are met.
 |
 |
|---|
Win/Lose Condition[edit | edit source]
When enemies go through your base, your life would be deducted a point, and reaching zero leads to a game over. Successfully beating all enemies and maintaining at least 1 life would lead to a victory. Depending on your performance on keeping characters alive, and enemies away from the base would determine your star rating, which may determine some of the drops you will get. Beating a stage with 3 stars unlocks their 4 star challenge, and ability to use skip tickets to bypass playing the stage for farming purposes. Characters you bring along in a stage will gain bond at the end, regardless if they were used or not.
Status Ailments[edit | edit source]
There are few status conditions characters can be subjected to in game. Here are what's been seen:
- Stunned - Character cannot attack, block, or move.
- Charmed - Character will stop blocking and attack any allies within their range. Ground melee characters will be able to reach high ground ones.
- Poisoned - Character receives gradual damage over time.
Character Stats and Information[edit | edit source]
See Character Stats