User Interface: Difference between revisions
(WIP, still a lot of outdated information to replace. Someone else can continue editing if they're up for it.) |
|||
| Line 1: | Line 1: | ||
__TOC__ | __TOC__ | ||
== The Home Screen == | |||
[[File:Example Home.png|border|right|frameless|734x734px]] | |||
The ''Anothereidos'' home screen can be categorized in Three Sections: | |||
<u>Top</u> | |||
Everything that revolves around your main resources like Draco, Stamina and Dragon Vein Stones as well as your Name and Level are visible on the top side of the. You can use the plus icon next to your stamina meter to quickly access the stamina replenishment menu and you can use the plus sign next to your stone count to quickly access the shop. | |||
'''The Bottom Side''' - Probably everything that should interest the player: '''Party''' for party formations, '''Scout''' for summoning, '''Strengthening''' for character strengthening, '''Shop''' for shopping, '''Warehouse''' for your item inventory, and of course the main | All quests including story, exploration and event are accessed by clicking the header(s) in the upper right. | ||
<u>Bottom</u> | |||
rea where your stamina is shown. | |||
'''The Bottom Side''' - Probably everything that should interest the player: '''Party''' for party formations, '''Scout''' for summoning, '''Strengthening''' for character strengthening, '''Shop''' for shopping, '''Warehouse''' for your item inventory, and of course the main functi | |||
At the bottom left corner, you'll see announcements regarding banners, updates etc. | At the bottom left corner, you'll see announcements regarding banners, updates etc. | ||
<u>The Left Side</u> | |||
uncements regarding banners, updates etc. | |||
'''The Left Side''' - Staple but lesser important features like InGame Mails, Your Profile and Friends, The Settings and a News function are available here. | '''The Left Side''' - Staple but lesser important features like InGame Mails, Your Profile and Friends, The Settings and a News function are available here. | ||
| Line 24: | Line 32: | ||
The Quest Selection, ''as of now'', is relatively easy to understand and available after you're done with the tutorial. On the Lower part of the screen you can either select [[Main Storyline|The Story]] as well as the [[Exploration Quests]]. You can leave the screen by simple pressing the back or home button on the top corner. | The Quest Selection, ''as of now'', is relatively easy to understand and available after you're done with the tutorial. On the Lower part of the screen you can either select [[Main Storyline|The Story]] as well as the [[Exploration Quests]]. You can leave the screen by simple pressing the back or home button on the top corner. | ||
Selecting the Story will lead you to the map you likely have seen when first starting the game. Each Chapter in the | Selecting the Story will lead you to the map you likely have seen when first starting the game. Each Chapter in the Stor | ||
<gallery widths= | == The Quest Selection == | ||
File: Quest Selection. | To start a quest, select the header in the topmost right section of the home menu. From there, you can select [[Main Storyline|The Story]], [[Exploration Quests|Exploration]], or [[Event Quests|Events]]. Any exploration and event quest can be started at anytime. Story quests must be completed in chronological order. | ||
File: | <center> | ||
File: | <gallery widths="250" heights="200" perrow="4"> | ||
File:Example Quest Selection.png | |||
File:Example Story Selection.png | |||
File:Example Exploration Selection.png | |||
</gallery> | </gallery> | ||
</center> | |||
== Your Team and You! == | |||
==Your Team and You!== | Probably one of the most important functions in the game: '''The Teambuilding''' and '''Development''' Aspect. You can save up to 4 Parties - perhaps for different strategies, showing off your favorites or just for try out something - and give each party a name, if you want to of course. | ||
Probably one of the most important functions in the game: '''The Teambuilding''' and '''Development''' Aspect. You can save up to 4 Parties - perhaps for different strategies, showing off your | |||
Each party will have the [[Main Character/Gaia|Main Character]] in it - but don't worry - press simply on '''Form Party''' and you'll quickly create a new party in no time! | Each party will have the [[Main Character/Gaia|Main Character]] in it - but don't worry - press simply on '''Form Party''' and you'll quickly create a new party in no time! | ||
| Line 46: | Line 54: | ||
''In Theory'' we should be able to '''Level Up''' or Characters with Gold and EXP, '''Improve Skills''', '''Rank Up''' and '''Limit Break''' the Character from the Strengthen Screen but as of now only Leveling up is available. | ''In Theory'' we should be able to '''Level Up''' or Characters with Gold and EXP, '''Improve Skills''', '''Rank Up''' and '''Limit Break''' the Character from the Strengthen Screen but as of now only Leveling up is available. | ||
<gallery widths=250px heights=200px perrow=4> | <gallery widths="250px" heights="200px" perrow="4"> | ||
File: Party_Screen_Example.jpeg|left|thumb|300px|Make sure to fill your party with the characters you like to use! | File: Party_Screen_Example.jpeg|left|thumb|300px|Make sure to fill your party with the characters you like to use! | ||
File: Strengthening_Screen_Example.jpeg|thumb|300px|A collection of all the characters you've summoned. | File: Strengthening_Screen_Example.jpeg|thumb|300px|A collection of all the characters you've summoned. | ||
| Line 60: | Line 68: | ||
Be careful though, these scenarios are '''NSFW''' and should be treated as such! | Be careful though, these scenarios are '''NSFW''' and should be treated as such! | ||
<gallery widths=250px heights=200px perrow=4> | <gallery widths="250px" heights="200px" perrow="4"> | ||
File:Interaction_Selection_Screen.jpeg|Simply select a character you like and.. | File:Interaction_Selection_Screen.jpeg|Simply select a character you like and.. | ||
File: Interaction_Screen_Example.jpeg|...enjoy spending time with them! | File: Interaction_Screen_Example.jpeg|...enjoy spending time with them! | ||
| Line 71: | Line 79: | ||
If you want to follow your friends, simply enter their code under '''Friend Search''', your friends should be then able to follow you back - as long as they don't hit the friends limit! | If you want to follow your friends, simply enter their code under '''Friend Search''', your friends should be then able to follow you back - as long as they don't hit the friends limit! | ||
<gallery widths=250px heights=200px perrow=4> | <gallery widths="250px" heights="200px" perrow="4"> | ||
File:Player_Profile.jpeg|Personalize your Profile with a witty Signature! | File:Player_Profile.jpeg|Personalize your Profile with a witty Signature! | ||
</gallery> | </gallery> | ||
Revision as of 03:46, 3 December 2022
The Home Screen

The Anothereidos home screen can be categorized in Three Sections:
Top
Everything that revolves around your main resources like Draco, Stamina and Dragon Vein Stones as well as your Name and Level are visible on the top side of the. You can use the plus icon next to your stamina meter to quickly access the stamina replenishment menu and you can use the plus sign next to your stone count to quickly access the shop.
All quests including story, exploration and event are accessed by clicking the header(s) in the upper right.
Bottom
rea where your stamina is shown.
The Bottom Side - Probably everything that should interest the player: Party for party formations, Scout for summoning, Strengthening for character strengthening, Shop for shopping, Warehouse for your item inventory, and of course the main functi
At the bottom left corner, you'll see announcements regarding banners, updates etc.
The Left Side
uncements regarding banners, updates etc.
The Left Side - Staple but lesser important features like InGame Mails, Your Profile and Friends, The Settings and a News function are available here. You can also Change the character you want to appear in your Profile as well as in your Homescreen. And as of 1.0.5.2, You can change the position and zoom of your partner character.
The Quest Selection
The Quest Selection, as of now, is relatively easy to understand and available after you're done with the tutorial. On the Lower part of the screen you can either select The Story as well as the Exploration Quests. You can leave the screen by simple pressing the back or home button on the top corner.
Selecting the Story will lead you to the map you likely have seen when first starting the game. Each Chapter in the Stor
The Quest Selection
To start a quest, select the header in the topmost right section of the home menu. From there, you can select The Story, Exploration, or Events. Any exploration and event quest can be started at anytime. Story quests must be completed in chronological order.


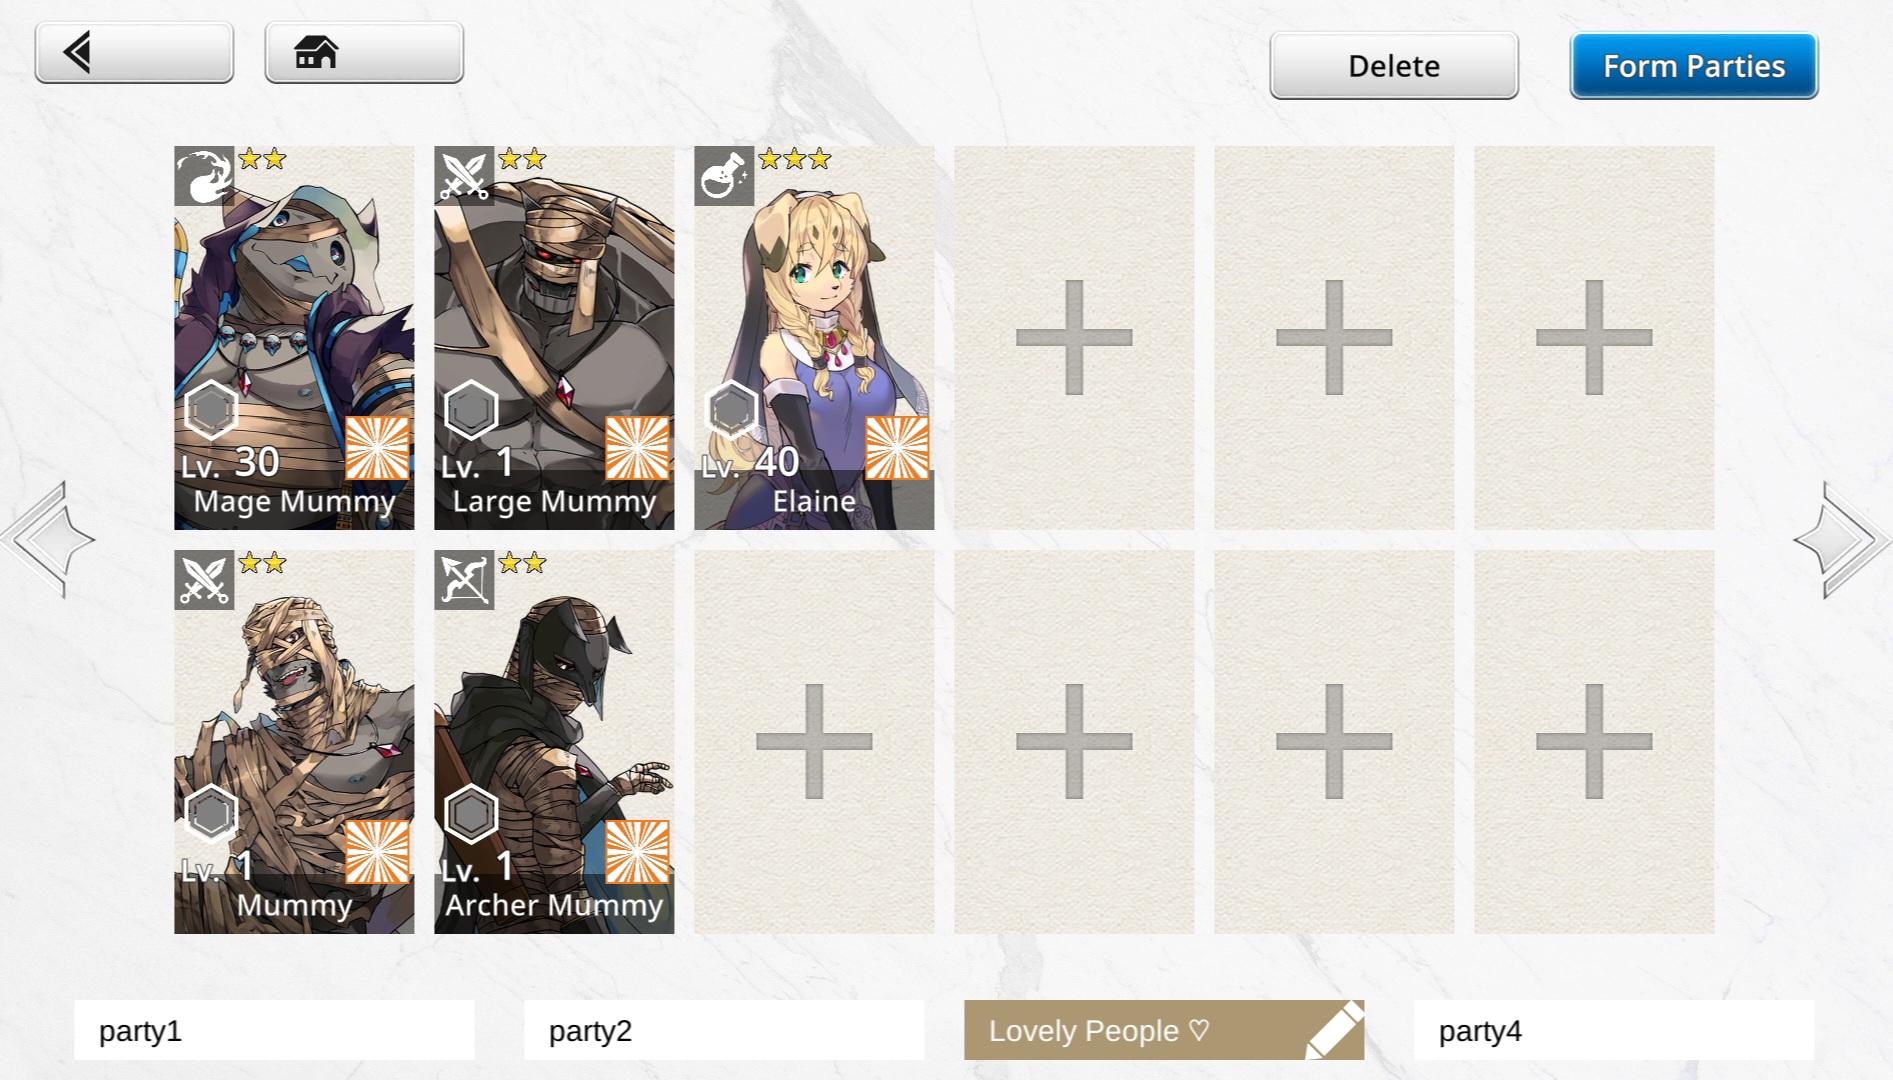
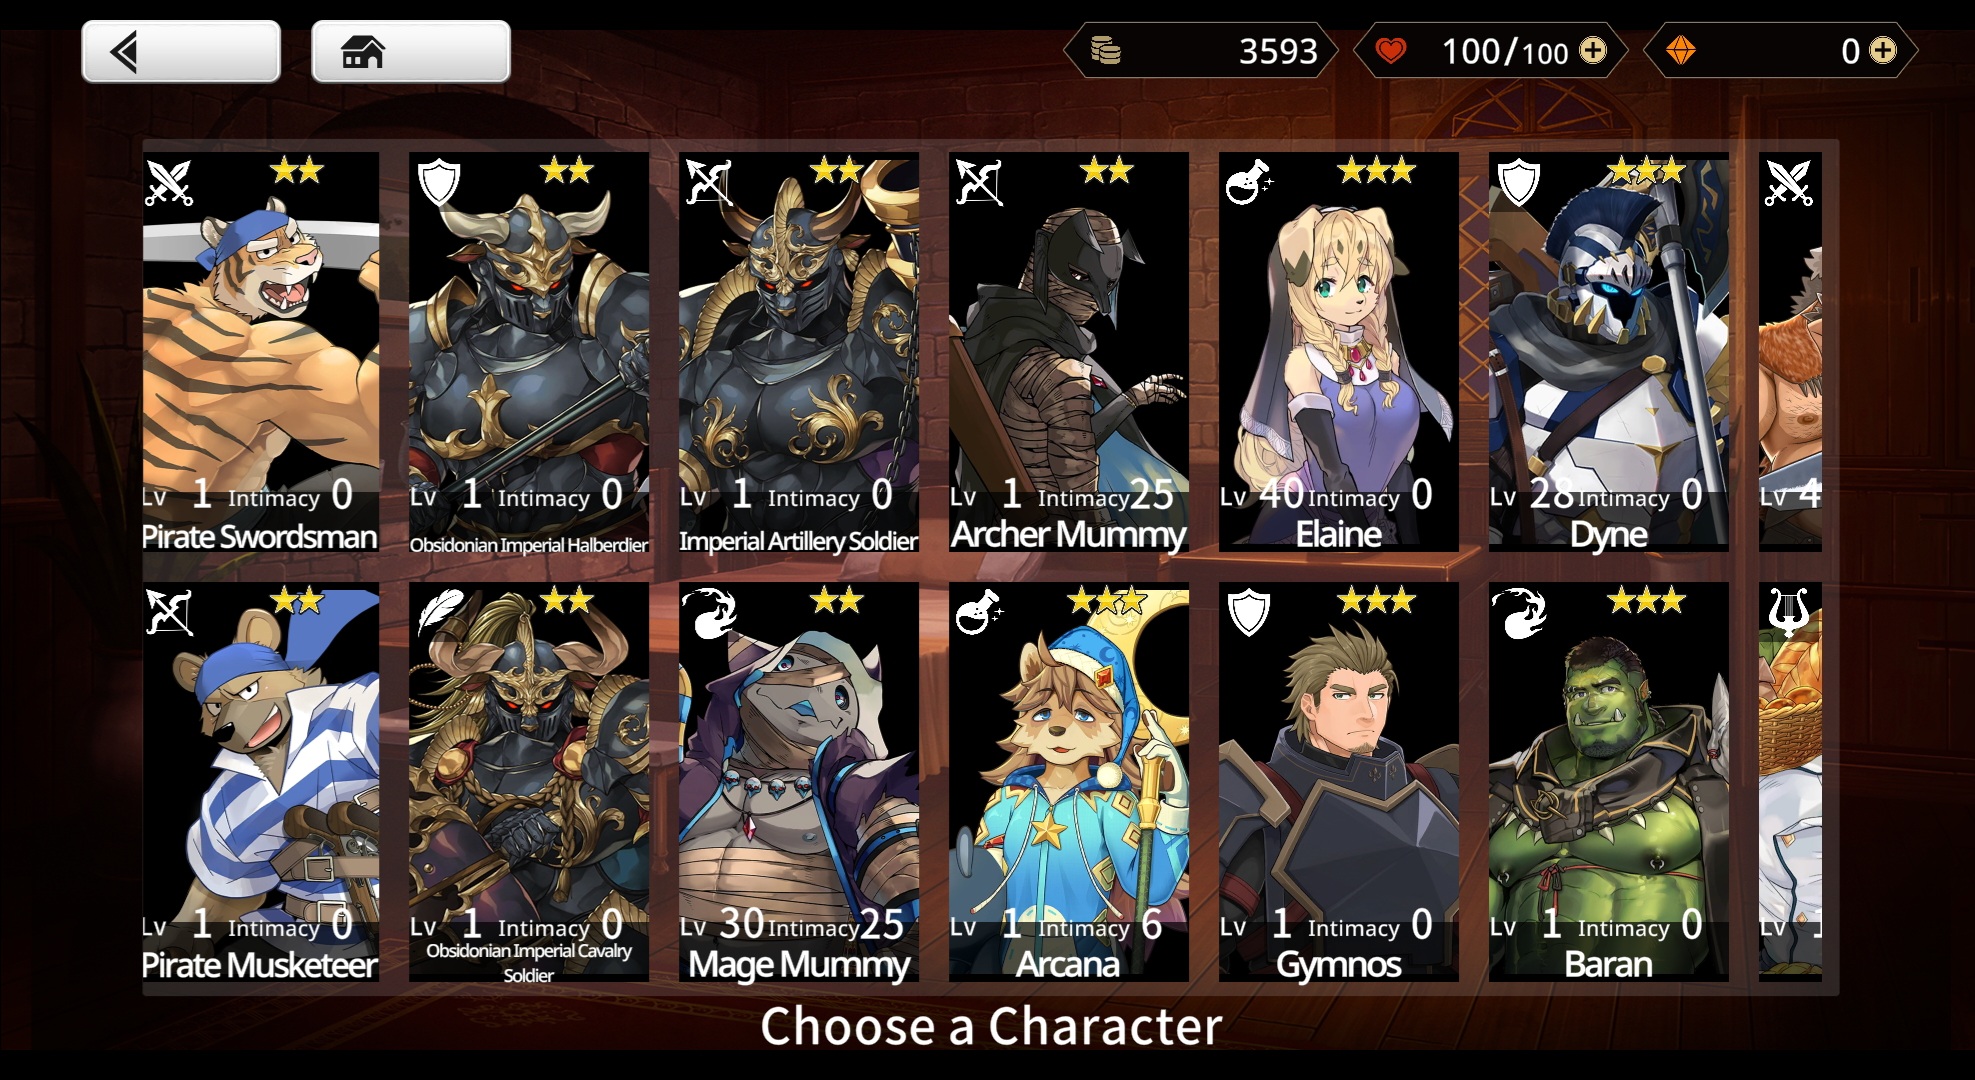
Your Team and You!
Probably one of the most important functions in the game: The Teambuilding and Development Aspect. You can save up to 4 Parties - perhaps for different strategies, showing off your favorites or just for try out something - and give each party a name, if you want to of course. Each party will have the Main Character in it - but don't worry - press simply on Form Party and you'll quickly create a new party in no time!
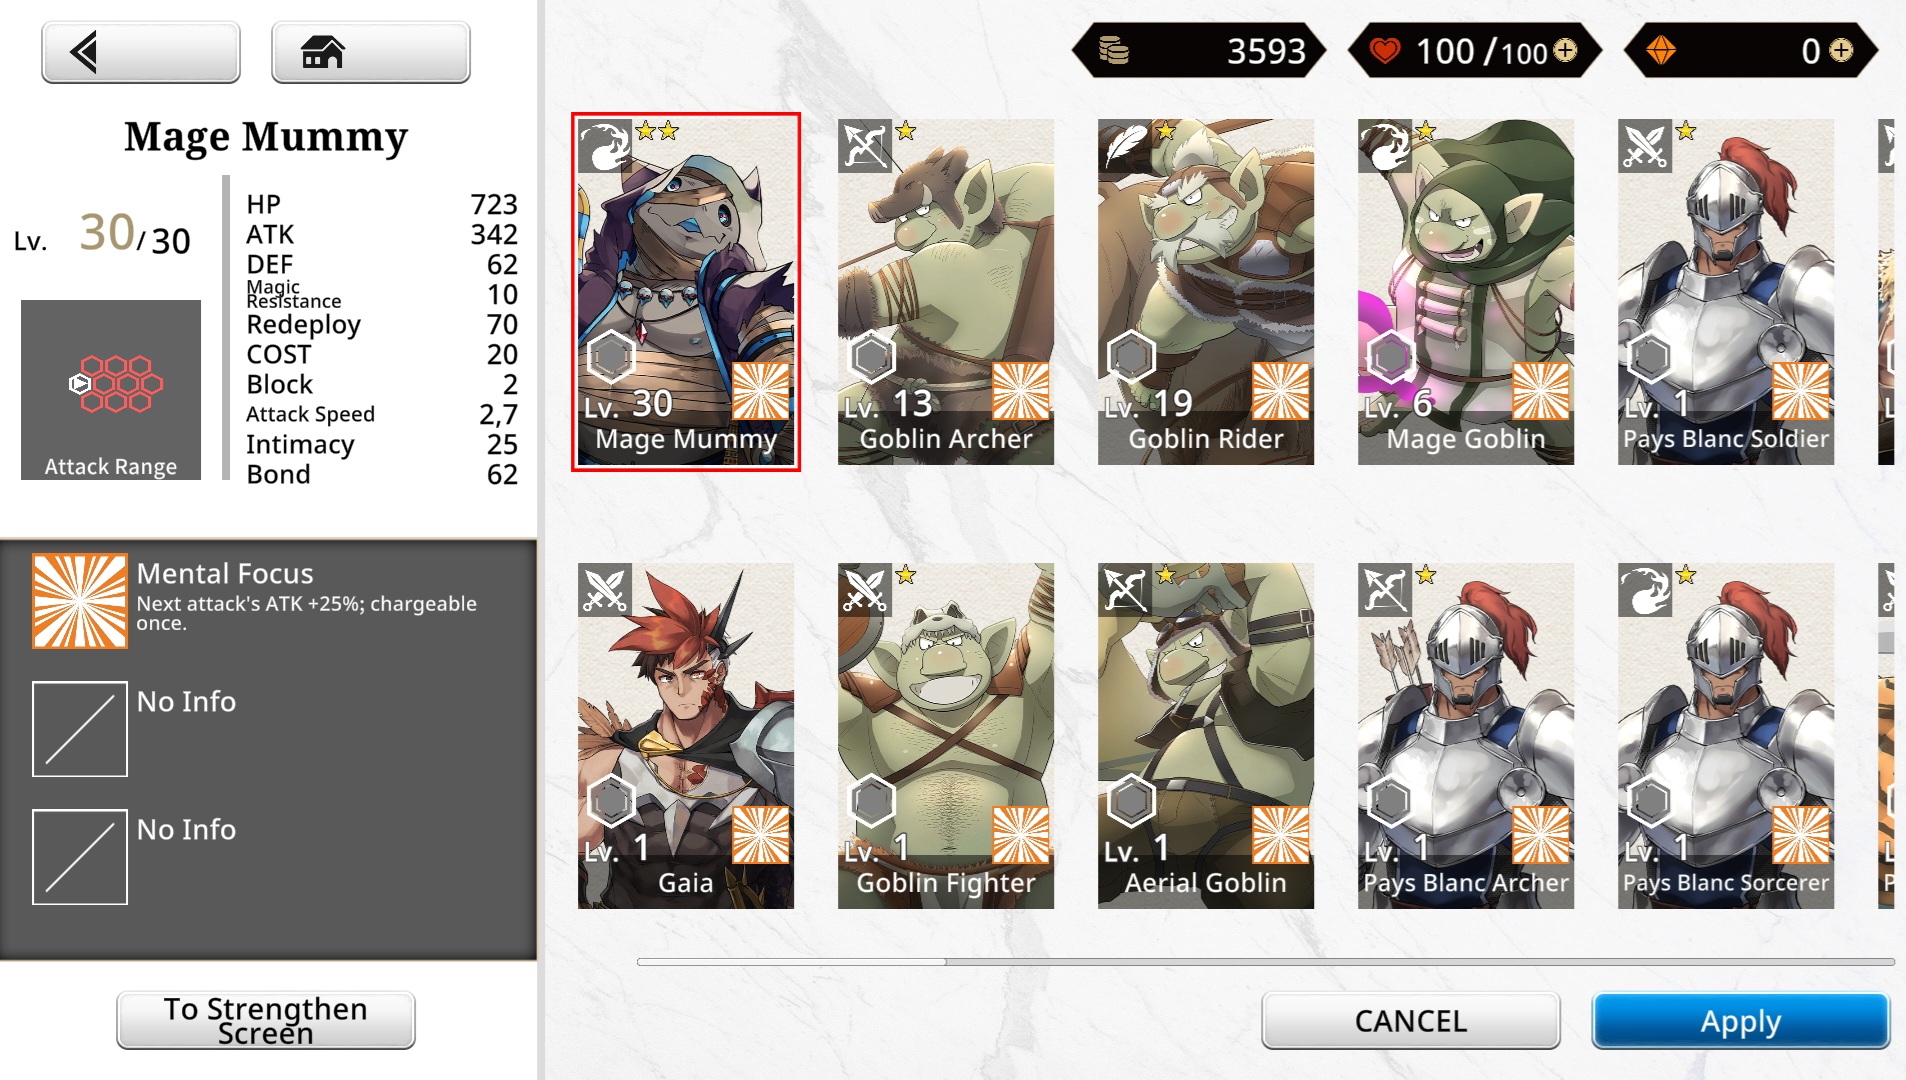
By simply pressing on one of your party members - or using the strengthening option on the Homescreen - You will be lead to all your characters you have collected. Selecting one of them will give you a quick Overview on their stats, their range, their skills and the maximum level they can reach.
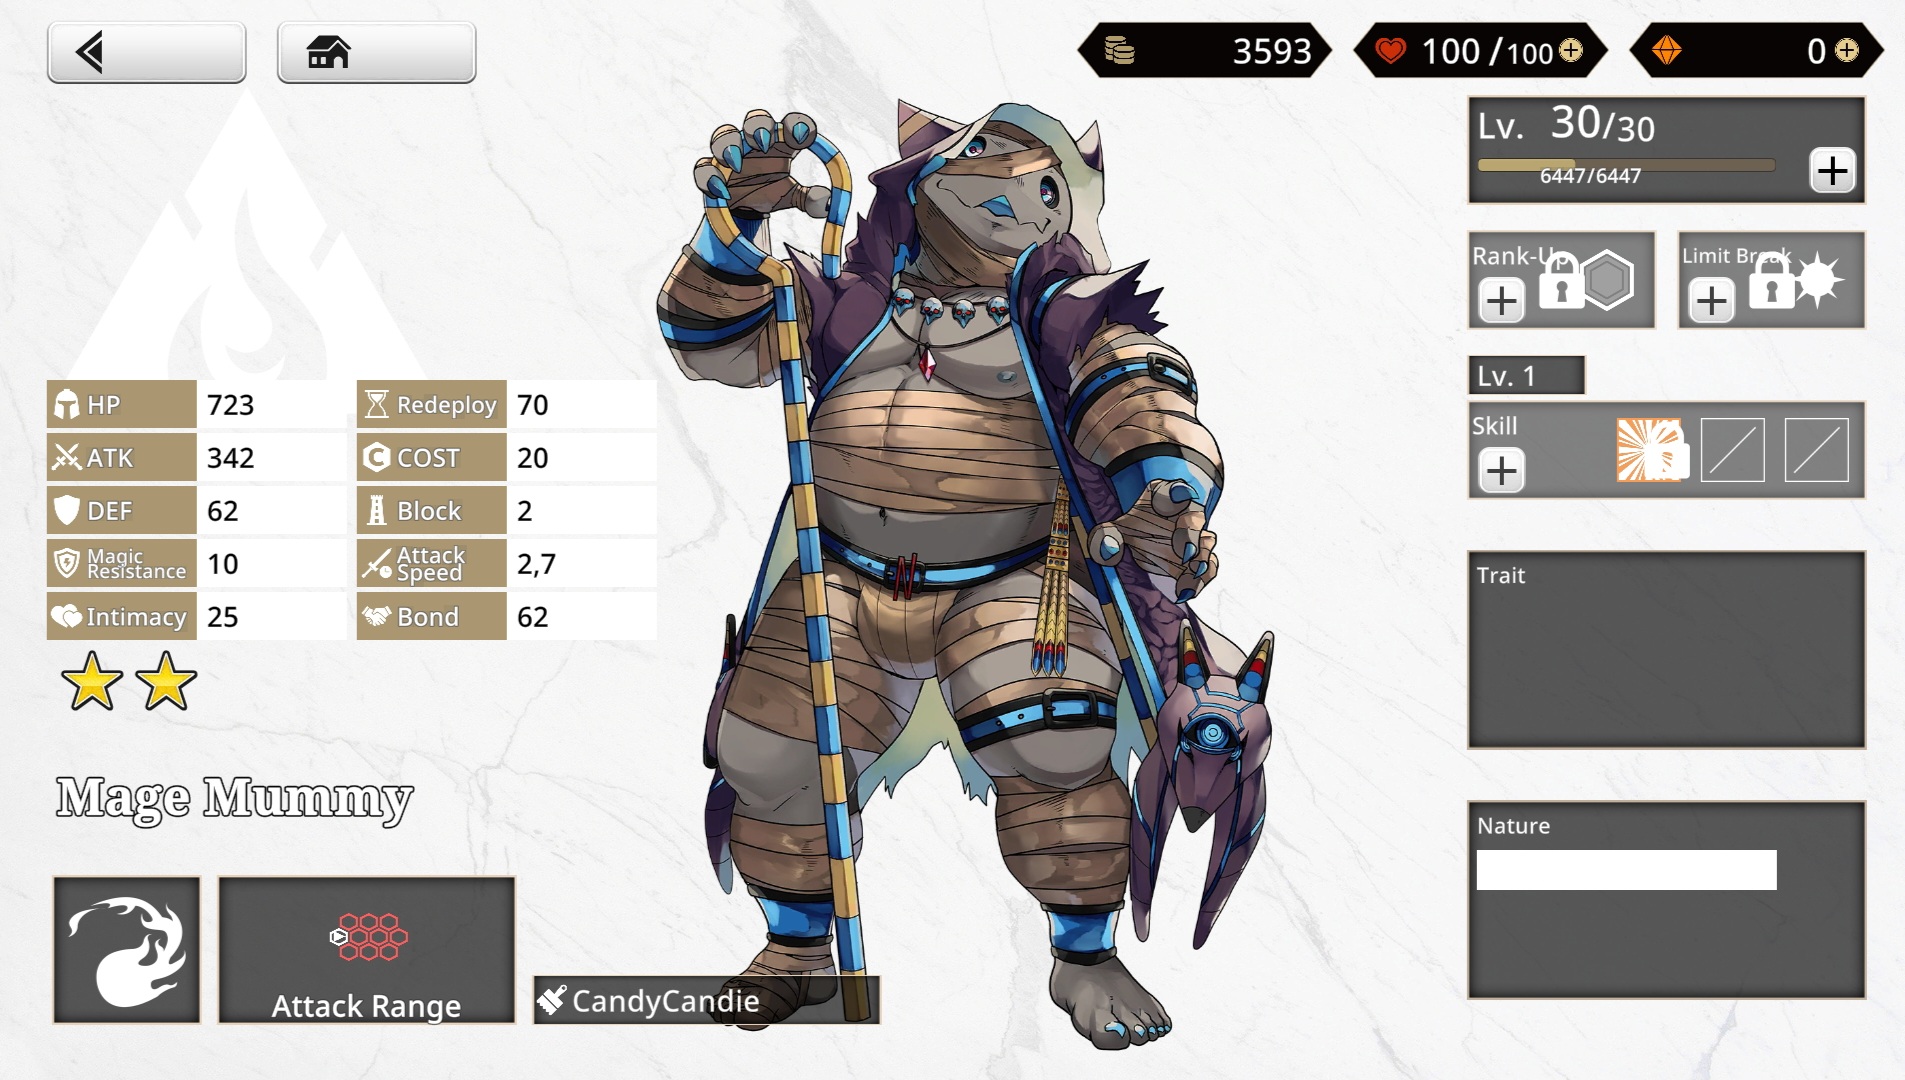
Pressing the To Strengthen Screen will lead you to the Characters in depth Page. Depicted, besides the mentioned informations from the overview, are the rarity, the trait, the nature and even the characters Illustrator as well.
In Theory we should be able to Level Up or Characters with Gold and EXP, Improve Skills, Rank Up and Limit Break the Character from the Strengthen Screen but as of now only Leveling up is available.
-
Make sure to fill your party with the characters you like to use!
-
A collection of all the characters you've summoned.
-
The Character Screen will provide you with all the necessary informations
-
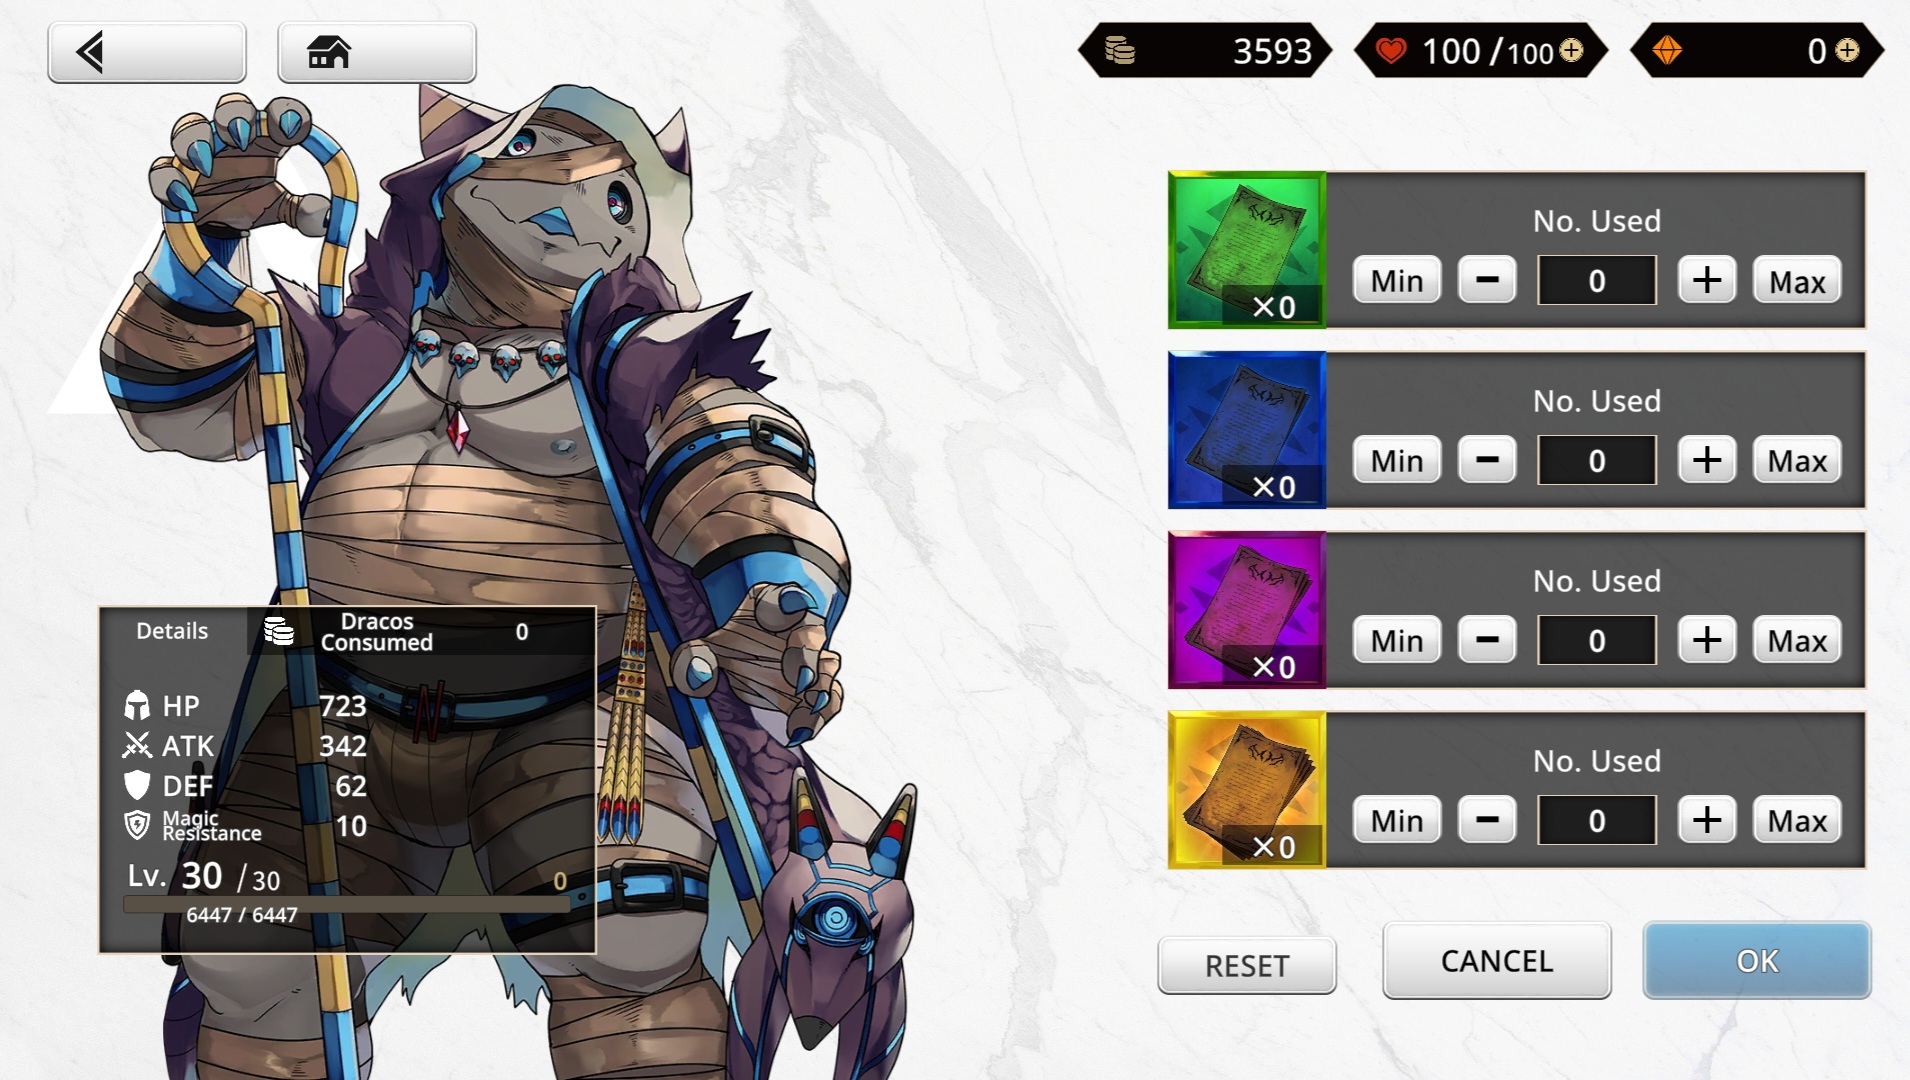
Leveling up your Characters requires Gold and Exp!


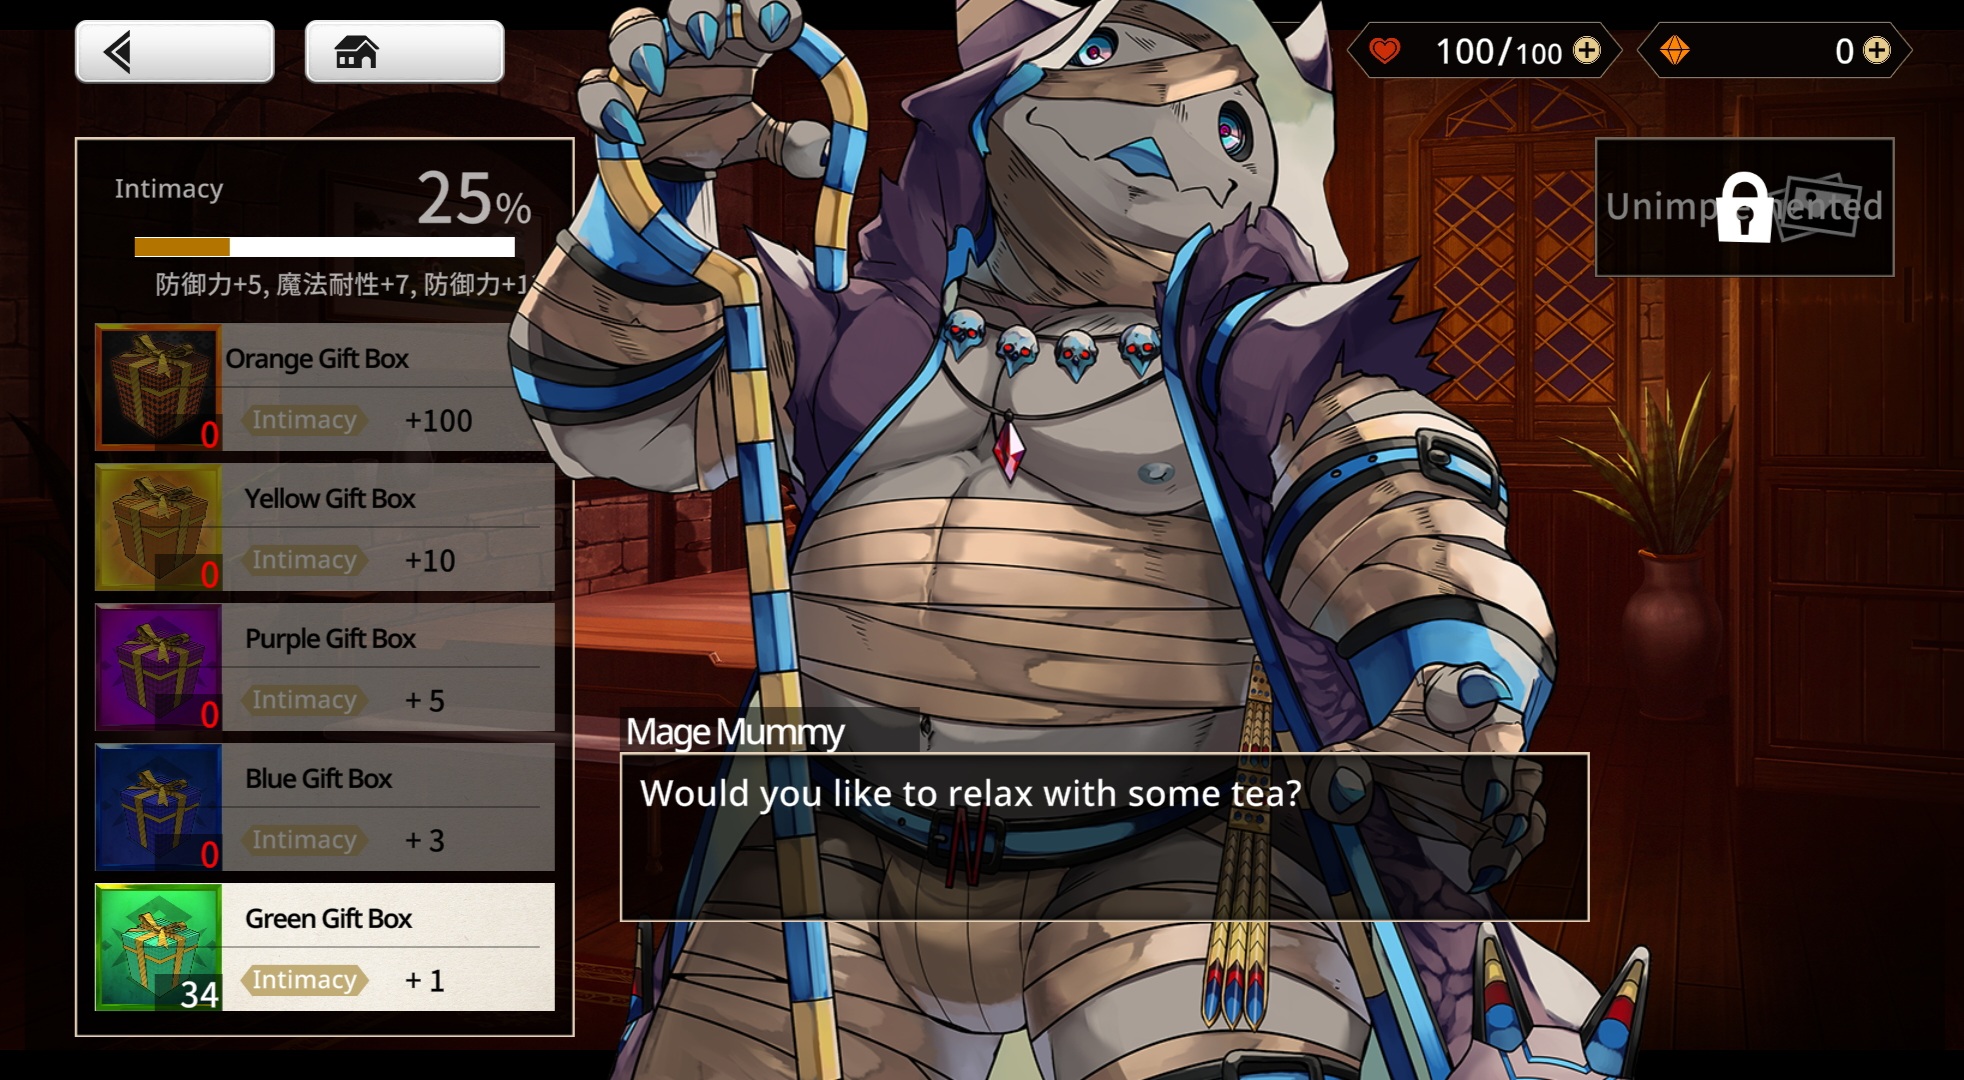
Interactions
Probably the highlight of the game, Interaction allows the player - as the name suggest - interact with their characters by gifting presents, receiving stat bonuses and...
...unlocking a variant of Scenarios by reaching an Intimacy of 100%!
Be careful though, these scenarios are NSFW and should be treated as such!
-
Simply select a character you like and..
-
...enjoy spending time with them!


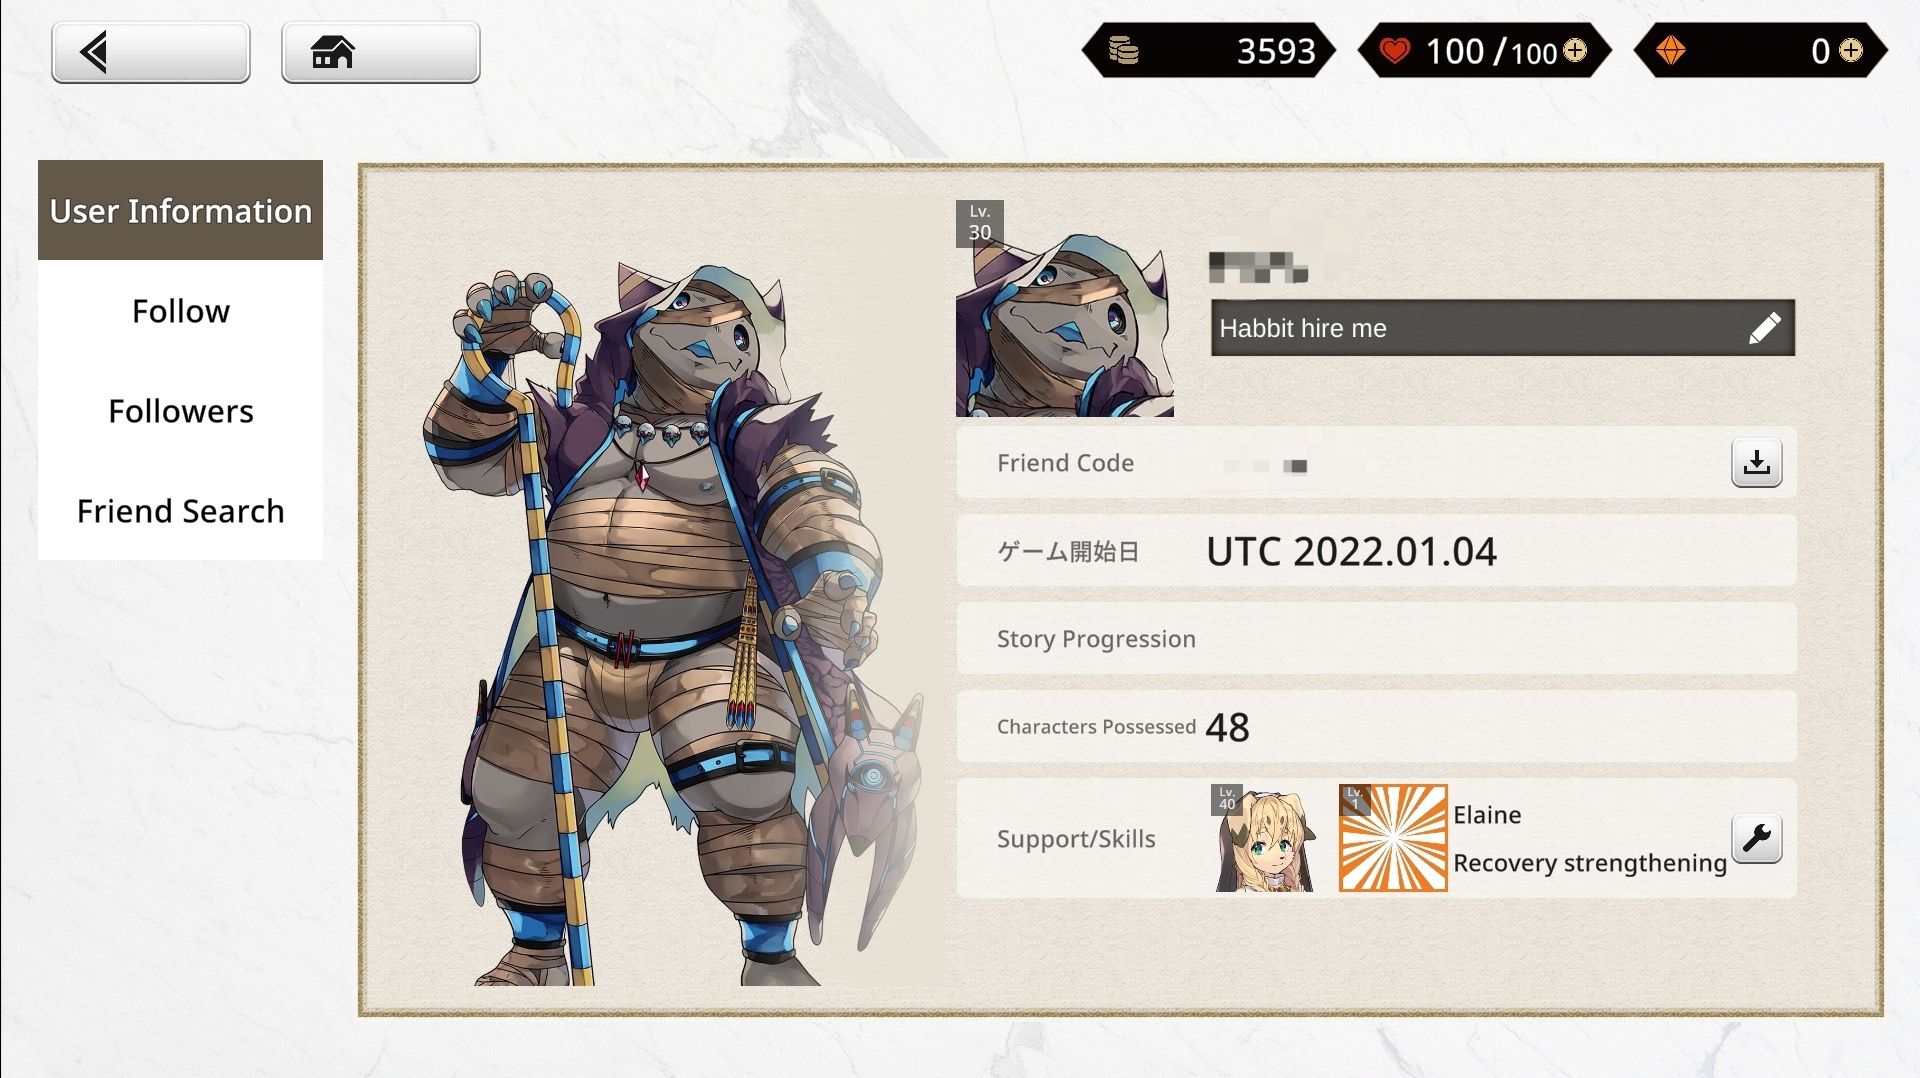
Profile and Friends
As mentioned above, on the left side of the homescreen, below the mail symbol, you'll enter your profile! It displays Player information like Your Friend Code, The amount of Characters you have collected, Your Story Progression, Your Assistent that is displayed on the homescreen and your Support Character you can lend your friends with in the future someday.
If you want to follow your friends, simply enter their code under Friend Search, your friends should be then able to follow you back - as long as they don't hit the friends limit!
-
Personalize your Profile with a witty Signature!
